Location Adds New Dimension to Digital Stories
A few years ago, I attended a workshop by KQED, the public media station for Northern California. The workshop was focused on place-based storytelling in the classroom. The idea was simple: people have compelling narratives tied to geographic locations. By collecting those narratives, you can create a compelling, well-rounded, emotional story of a place.
This idea struck me as brilliant immediately. But it was difficult to articulate why. I realized that, first off, there is so much science — and, specifically, environmental science — that’s tied to a geographic location. By collecting individual narratives about, for example, the Monterey Bay Marine Sanctuary, you can start to tell the story of the sanctuary itself.
The second reason I love place-based storytelling so much didn’t come to me until I was actually working on a project with teachers and, later, students. Being a native of New Orleans, I understand intimately that a place is more than an inanimate object — a place can be just as important as any character in any story. People have emotional connections to places that are just as strong as emotional connections to family members. Places make us who we are. Places become part of us.
This narrative, while focused on a boy and his family recipe, also tells part of the story of a city:
It’s that emotional connection to place that is so powerful. When people — and, specifically, students — tell their story of a place, they begin to see the value of that place. By articulating their personal connection to that place, they realize not only its importance but its role in shaping lives.
As an environmental science educator, I know that realization is key to what I’m trying to teach students.
Yes, place-based storytelling allows students to discuss and, therefore, better understand scientific and historical concepts. But it also helps them realize the importance of those concepts in their own story. And, thus, it makes them more passionate about protecting those places.
So how does it work? PBS has a great in-depth step-by-step guide (with videos) for teachers, but I’ve had to modify it quite a bit to make it work for me — I rarely have enough time or equipment for students to complete the activities as designed by PBS. Below is my lite version:
STEP 1: Choose a place
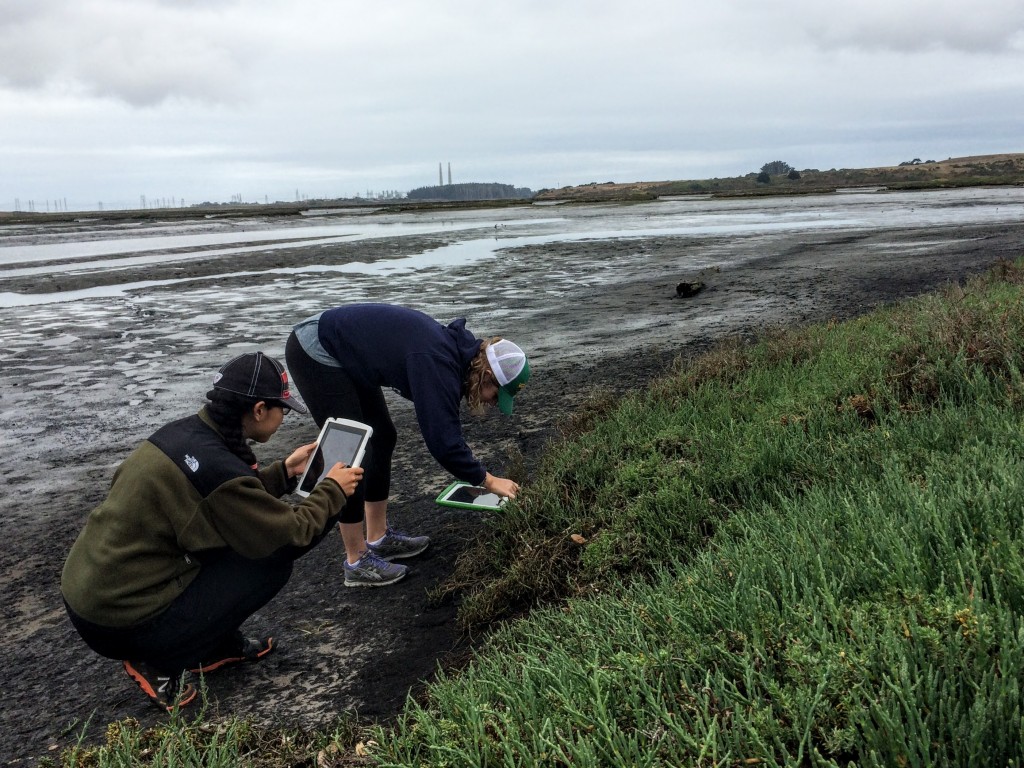 Choose a place that is in line with something your students are studying – a historic battlefield or downtown or a nearby ecosystem that your students can access. Maybe it’s a pond within walking distance of your school. Or maybe it’s a state park that you can visit on a field trip. In fact, this activity is a perfect way to give meaning and focus to any field trip. I’ve led this activity multiple times at a popular field site near me, the Elkhorn Slough National Estuarine Research Reserve. It’s an outdoor reserve that contains some of the last coastal wetlands on the West Coast.
STEP 2: Digital storytelling
Place-based storytelling begins with digital storytelling. That’s a pretty broad term, but I lean toward having students create videos and, specifically, one-minute documentaries. Depending on your students and resources, you can also have them write blog entries or poems enhanced by their own photos or videos. In terms of equipment, I’ve been really successful having students use smart phones, iPod Touches, and iPads. If your school/classroom has access to just a few of these devices, kids can work in pairs or take turns. If you don’t have access to these devices at all, invite students or chaperones to bring their own. You might also try to host a cell phone drive to collect old cell phones from the community, as these can still be used as cameras, even without SIM cards or monthly plans (click here for more details).
One-minute documentaries is one of my favorite activities, as it’s simple, takes little time, and is extremely versatile — I often lead it as a stand-alone activity outside of place-based storytelling. Click here for a full description of one-minute documentaries. The basic idea is this: students use a cell phone, video camera or iPad. They record something they see for one minute. As they record, they speak their narration. Students might have to re-record multiple times, but the idea is that they won’t have to edit their video together. It’s a one-minute continuous shot. Because of this simple format, I’ve seen pre-school students successfully create one-minute documentaries. It’s also appropriate for older students and even adults. It’s an especially good activity for English-language learners, as they have multiple opportunities to practice their narration.
When I lead this activity, I often have learners work in pairs to identify one single thing at the location to learn about and share with the rest of the group. They don’t decide on this before the field trip — they decide on it after two-thirds of the field trip is over. In other words, we take our learners on a normal tour — hiking through the area, stopping at three main points of interest, answering questions and offering information. This portion works much as a regular field trip anywhere might. But the final hour of our field trip is where things change. After seeing a little bit of everything, the learners work in pairs to choose one thing they saw that interested them. One pair chose a nest in a tree. Another chose a frog. Another chose an owl pellet. Another focused on the movement of the water current. There are no parameters — the groups are allowed to choose anything that interests them, and that becomes the focus of their documentary. Although one-minute documentaries require students to generate informational writing/narration, this choice allows the videos to still be very personal for each student.
Aside from the documentary format, you might choose to have students narrate more of a personal narrative about their connection to the place, or some combination of the two.
When students are finished with their stories, have them upload them to YouTube. Depending on the age of students and the wifi availability of the field trip locale, I sometimes have learners do this as soon as they complete their documentaries. Other times, we wait until we return to our classroom. With younger students, you or a parent volunteer might need to upload the videos. (If YouTube isn’t available at your school, any video hosting site will work.)
STEP 3: Collaborative mapping
You could stop your lesson with the creation of digital stories. But I absolutely love this final step, where students add their stories to a collective collaborative map.
Each student may have only told one story of a place but, when those stories come together, they start to tell the larger story of that location. And a class collaborative map can help make that happen.
For step-by-step directions on how to create a collaborative map, click here. But here’s the overview: create a Google Map and share it with the students in your class. Invite them to add a placemarker in the spot where they recorded their digital story. Then, have the students add a title to their placemarker and, in the description field, paste the link to their digital story.
In classes with multiple devices, I’ve had learners upload their videos to YouTube and then add the placemarkers (with links) all at the same time — often, during our field trip. In other classes, with more limited resources, I’ve had students rotate through a computer center, where they add their placemarker and link one or two at a time. (For younger students, I’ve seen teachers ask a parent volunteer or an older student to manage this center.)
Once all the videos are uploaded, students — as well as their families or others in the community — can use the collaborative map to go on a virtual walk through the place. They can watch digital story after digital story, to help better understand and connect to that place. And you can invite students to return to the map multiple times throughout the school year, each time thinking about it through a new lens.
This collaborative map, which features photos with detailed captions, was created by biology students at Hercules High School:
EXTENSION: Story Maps as Book Reports
I recently stumbled upon the website Story Maps, which is a subscription website based on the above FREE idea. Story Maps users can create their own stories and upload them to a map (using the Map Tour feature), or they can curate stories posted by others on social media and post those to a map. Accounts to use the site are crazy expensive ($2,500!!!), though there are discounts for schools. But it’s free to browse the maps created by others, so I use the site for inspiration.
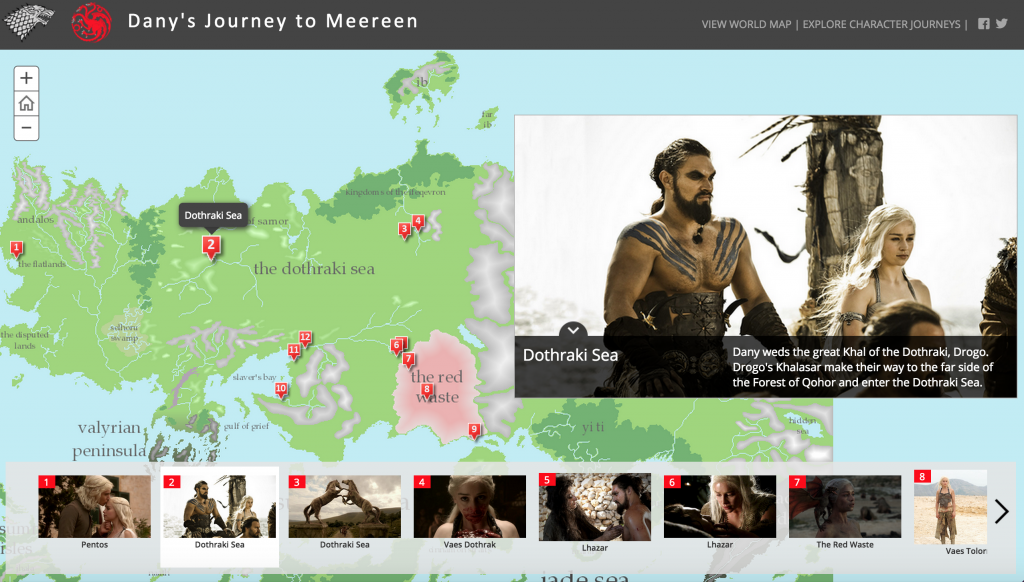 While most of the story maps seem to be created as marketing devices for various American cities, there are a series of story maps created around the Game of Thrones book and television series. This story map shows the journey of one of the main characters — Daenerys Targaryen, a.k.a. the Mother of Dragons — through the fictional land described in the books.
This sparked an idea — although Game of Thrones might not be suitable for younger students, imagine a story map outlining the journey of Harry Potter or Katniss Everdeen. What a wonderful way for students to express their understanding!
Google Lit Trips does something similar with books based in real locations, using Google Earth. But how could students create these fictional maps, without the $2,500 subscription to Story Maps? As described above, students could create various digital stories about the characters’ journeys in the book. Then, using a FREE education account on Prezi, students could use a map of the fictional land (either found online or, better yet, drawn by students and then photographed) as the background. Then, students could add their digital stories to the appropriate spot on the map. They could take turns with the Prezi, or they could use Prezi’s collaborative editing feature (which works similarly to sharing Google documents).
If you try collaborative mapping in your classroom, let us know how it went — what worked for your students? What didn’t? Share your successes and challenges in the comments, so we can all learn from them. And we always love to see your students’ work — share it below, and I might feature it in an upcoming post!


