Students as VR Tour Guides (using all free tools)
In the past six months, virtual reality has exploded. The main reason is that it’s actually become affordable and easy to create the 360-degree (or spherical) images used for VR.
Milky Way from an Norikura Observatory in Mt. Marishiten-dake, Japan – Spherical Image – RICOH THETA
Just this month, both YouTube and Facebook have added features that allow users to easily upload and view 360-degree images and videos on those platforms. One of the coolest things about these images and videos is that if you have a Google Cardboard headset, which you can purchase for $5-$10 (or make yourself, in a few hours), you can use the images to create a true virtual reality experience.
It’s Cool, But Why Use It in Education?
I’ve never been one to say that the newest tech, by virtue of being cool, is enough to warrant its use in classrooms. But the cool factor of VR is pretty remarkable and will definitely increase the engagement level of students, at least for a while. (Research shows that engagement is directly tied to learning.)
Google Expeditions, which was released to the public today after a couple of years in beta testing, shows how VR can be used to help students learn about places they can’t visit, such as the past or the deep sea.
But I’m more interested in how students can learn through the creation of their own VR experiences. And, as the digital learning manager at a conservation-based environmental science institution, I know the importance of students actually (rather than virtually) getting outside.
There is a lot of research to support place-based education, which integrates all subjects to use a local ecosystem as the core of instruction. The ease of spherical image creation is a great way for students to capture their time in a place and explain the importance of that place. We take students to various parts of the Monterey Bay — from historic Point Lobos State Reserve to Elkhorn Slough, one of the last saltwater estuaries on the West Coast. Students learn about the natural histories of these places, as well as the positive and negative impacts humans have had on them. We often have students create one-minute documentaries while in these places.
Now, though, I’m asking students to create 360-degree images of their favorite vantage point. Then, I’m having them use their learning to narrate what they see, creating a sort of virtual reality tour.
Depending on your goals, you might have students write poems or personal narratives or human histories about these places and record them as narration.
Point Lobos using Google Street View – Spherical Image – RICOH THETA
How To Create 360 Images
So how does it work? The easiest way to create spherical images (and videos) is with a specialized camera, such as the Ricoh Theta-S, but those run about $400 each, meaning most teachers will only be able to afford between none and one for a class of students.
But don’t worry — there’s a free option that will allow students to work individually or in small groups to create spherical images. The Google Photo Sphere on Android devices and the Google Street View app on iOS devices prompts users to take a series of photos, which the app then stitches together to create a spherical view. This is the same technology Google created for the street view images you see on Google Maps. (The example shown above, of Point Lobos State Reserve, was created using the Google Street View app on an iPhone 5S.)
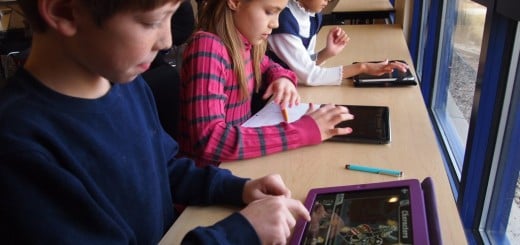
One caveat to consider: while the Google Street View app works great on iPhones, it currently won’t download onto iPads or iPod Touch devices. (UPDATE: As of October 2016, Google Street View now works on iPods and iPads. Hooray!) While I generally use class iPads and iPods with students, my middle and high school kids had enough personal devices to create spherical images on their own phones in small groups. For younger students, I’ve had good luck asking chaperones who are comfortable with it to loan their devices to their student groups during field trips. (Another option is to have an iPhone drive in September, after the new models are released. Ask community members to donate their old phones to your school. Without a data plan, older iPhones still connect to wifi and run apps, like an iPod Touch.)
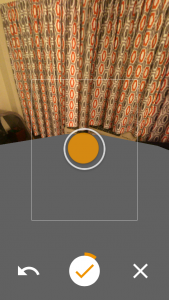
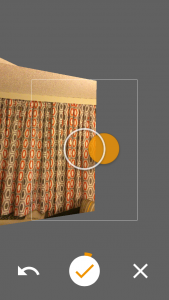
To create the image, open the Google Street View app. Tap the + in the lower corner. Select “camera.” The app will then prompt you to take a series of photos, by displaying orange dots on your device which you follow with the camera. The important part of this process is that the photographer stays in one place, while rotating to take the series of photos. It helped me to stand in sand, so I could keep my feet in the same prints while rotating. I’ve also tried standing on a marker, such as a piece of paper.
When the photos are taken, the app will take a moment to stitch them together. It will save the finished spherical photo to your phone’s camera roll and ask if you’d like to publish it on the app for others to see.
How to View Spherical Images
Full disclosure: as of this writing, I’ve only used iOS devices for the next two steps. Things might work a little differently on other devices.
You can use the Google Street View app to view your image, by swiping around it after you’ve taken the photo. There is also an icon of a Google Cardboard mask in the corner of such images. Tapping this will allow you to view the image using Google Cardboard for a truly VR experience.
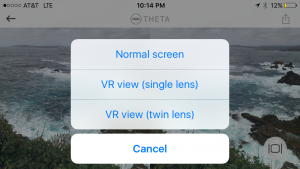 I’m not a huge fan of the Street View app for viewing photos, though, as you can’t view other spherical images from your camera roll. Instead, I use the free Ricoh Theta-S app. Although it’s intended for use with the $400 camera, you can use the app to open any spherical photos from your phone’s camera roll. You can swipe around to view the image. Or, by tapping the rectangular icon in the corner, you can use your phone’s gyroscope to move around the image. You can also view it using Google Cardboard, by tapping the rectangular icon and selecting “VR view (twin lens).”
How To Add Narration (Sort Of)
This part is tougher (at least at the moment). Originally, I turned to the iMovie app on my phone. I created a new iMovie, imported the 360 image that was created with Google Street View, disabled the Ken Burns effect, and then recorded my narration. I had to stretch the length the image was shown to match my narration, but it seemed to work. I exported my video to my camera roll and opened it in the Theta-S app just as I would any other 360 image or video. Only, it didn’t quite work perfectly. Apparently, the aspect ratio of the Google Street View spherical images isn’t the same as the aspect ratio required for iMovies, so when the newly exported video was stitched together, it was overlaid a bit on the ends. That left a line going down the middle of the VR landscape. It worked okay, but it wasn’t ideal, especially when viewing in a Google Cardboard device. However, it will do in a pinch if you and your students are more comfortable with iMovie or other video editing apps.
My next attempt was to record my narration as a voice memo, thinking I could play it at the same time as the Theta-S app displayed the 360-image, creating a sort of poor-man’s narration. However, on iPads and iPods, the voice memos stop playing when you close the memos app in order to open the Theta-S image. But I found a free iOS app called Audio Loop, which allows you to record a voice memo and then play it back on a loop for a specific amount of time. This was perfect — students can use Audio Loop to record their narration, then set it to play back for the time they have to share. Then, they open their 360 image using the Theta app. They can pass their device around (preferably using Google Cardboard and headphones), and others can see and hear their guided VR tour playing on a loop. (This also works great if you’re leaving a set of Google Cardboards out for visitors during an open house.)
I think it’s really important for students to share their products outside the classroom. So, after the field experience, they can upload their 360 images to a site like Theta360.com or YouTube. Then, they can add a link to their accompanying audio file in the description. Again, not ideal, but it gets the job done without any additional cost.
This is a new technology, and there are new solutions every day. So if you’ve found better solutions, please share in the comments!